
Navigating Your RetroFoam Insulation Installation Experience
Homeowners in Wisconsin are turning to RetroFoam insulation for its cozy, energy-efficient benefits, much like a hand-knit sweater. This injection foam product fills every nook and cranny of your walls, providing superior warmth compared to traditional materials. RetroFoam breathes new life into your home’s heat retention, similar to upgrading an old sweater to a thermal-lined jacket. Understanding the installation process is key to a successful upgrade. This article will guide you through the steps of RetroFoam installation, from initial preparation to the final touches, ensuring maximum efficiency.
Key Takeaways
- RetroFoam Insulation Enhances Home Comfort and Energy Efficiency
- Professional Evaluation and Proper Preparation Are Essential for RetroFoam Installation
- Installation Usually Finishes Within a Day, Depending on the Home’s Size
- RetroFoam’s Airtight Sealing Feature Improves Thermal Insulation and Air Quality
- Regular Maintenance and Professional Checks Sustain RetroFoam’s Longevity and Performance
Preparing Your Home for RetroFoam Insulation Installation

Transforming your home with RetroFoam insulation begins with evaluating your specific needs, whether your walls are brick, wood, or concrete blocks. Utilize resources like RetroFoam’s learning center to find the best fit. Schedule a professional evaluation with Mammoth Home Renovations and explore financing options for a hassle-free experience. Preparing the work area and understanding the timeline will ensure a smooth, efficient installation process.
Assessing Your Home’s Insulation Needs
Assessing your home’s insulation needs requires a clear look at your current setup. Many homeowners might find that traditional materials like fiberglass fail to fill the gaps and cracks in concrete block structures. A detailed estimate provided by our expert sales team will clarify if RetroFoam injection foam insulation is the superior solution to envelop your home in comfort and energy efficiency.
Choosing RetroFoam Insulation
Choosing RetroFoam insulation depends on your home’s unique structure. Unlike cellulose or fiberglass, RetroFoam injection foam insulation provides superior energy savings by seamlessly adhering to walls, preserving the integrity of both drywall and the wall’s surface. This tailored approach enhances home comfort and ensures optimal insulation performance throughout the seasons.
Scheduling a Professional Evaluation
When you decide to enhance your home with RetroFoam insulation, setting up a professional evaluation is the next crucial step. This assessment provides insights on injecting the foam into your exterior walls, ensuring a snug fit that strengthens the bond between your home’s mortar and siding. Trusting this process to seasoned installers specializing in RetroFoam injection foam ensures that every nook and cranny is expertly addressed for maximum efficiency and comfort. This step is essential for optimal wall insulation and long-term benefits.
Preparing the Work Area for Installation Day
On the day of the RetroFoam insulation installation, homeowners can ensure a smooth process by clearing any obstructions. A comprehensive guide, often provided in PDF format, outlines steps to prepare the area, such as moving furnishings away from walls and ensuring a clear path for the installation hose to reach the exterior walls. This preparation aids the installers in working efficiently and helps manage overall costs by reducing the time spent rearranging the workspace.
Understanding the Installation Timeline
Understanding the timeline for RetroFoam insulation installation helps homeowners plan their day. Unlike traditional fiberglass insulation, RetroFoam fills each cavity through an efficient injection process, typically completing most projects in a single day. However, homeowners should be aware that extreme heat or cold may slightly alter the installation speed, as the foam needs to maintain its properties for proper application and curing.
The Step-by-Step Process of RetroFoam Insulation Installation
When homeowners choose RetroFoam for insulation, transitioning from chilly rooms to comfortable spaces begins with a structured installation process. Individuals are often influenced by positive reviews and detailed FAQs and are keen to understand the steps involved. The process starts with an initial inspection, where experts assess the property and move furniture away from walls to create a clear work path.
Next, precise access holes are drilled into the exterior walls, allowing the strategic injection of foam insulation into wall cavities, creating an airtight barrier. Once the cavities are filled, each hole is meticulously sealed to maintain wall integrity. The final steps include a detailed examination to ensure thorough insulation and a comprehensive cleanup, restoring the home to its original state but with vastly improved insulation.
Initial Inspection and Setup
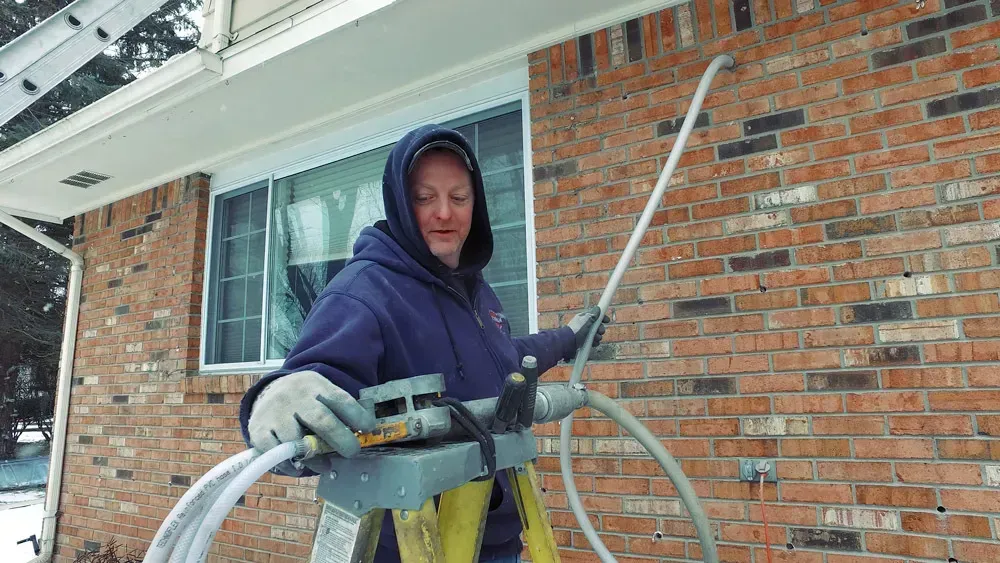
As northern Wisconsin homes prepare for another cold winter, the initial inspection by RetroFoam specialists is crucial for any insulation project. Homeowners looking to warm up their kitchens can schedule a free estimate. Professionals will assess the home’s envelope to plan how to install RetroFoam insulation. The installation process involves drilling a small hole into the sheathing, which is then securely plugged. Unlike typical spray foam insulation methods, RetroFoam aims to provide a secure and comfortable experience.
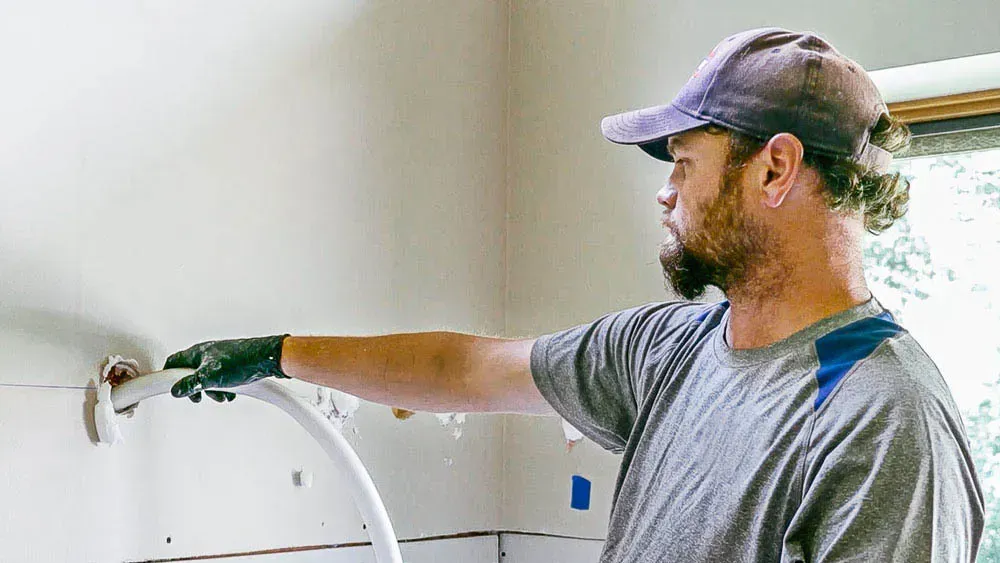
Drilling Access Holes in Walls
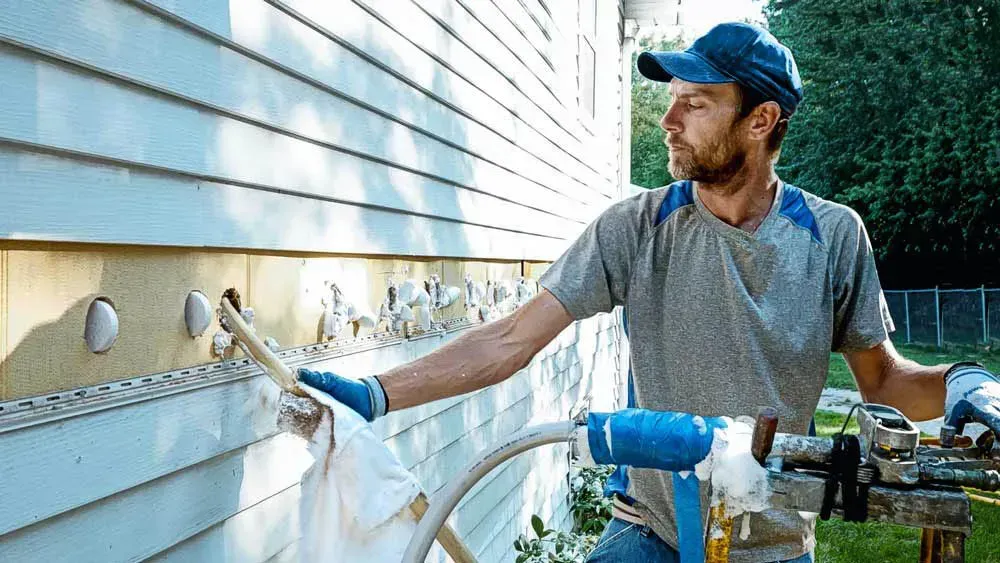
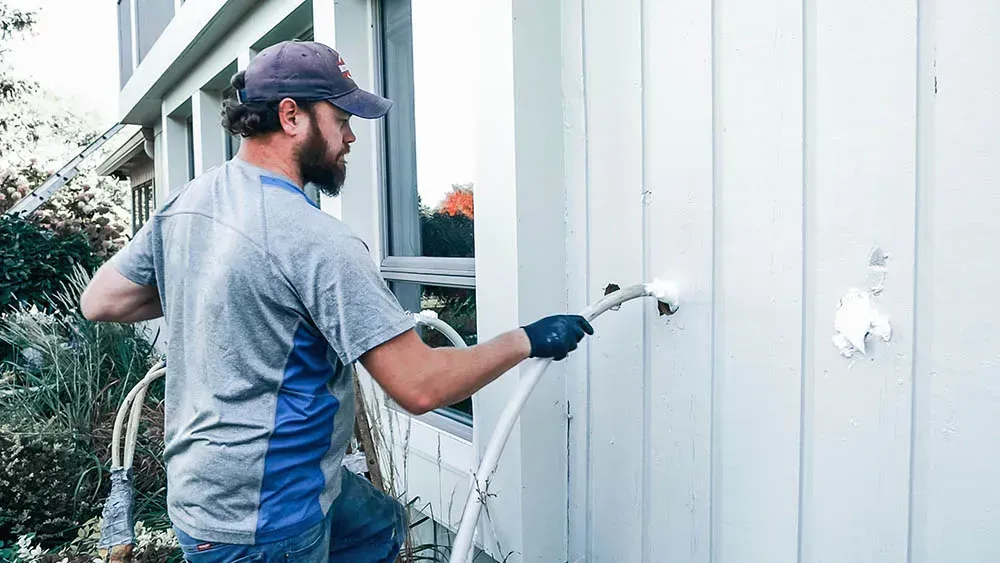
RetroFoam installation starts with drilling precise access holes into the wall exteriors, targeting areas between the studs. Contractors carefully perform this to minimize disruption to the home’s appearance. These entry points allow the energy-saving RetroFoam insulation to be injected into the walls efficiently.
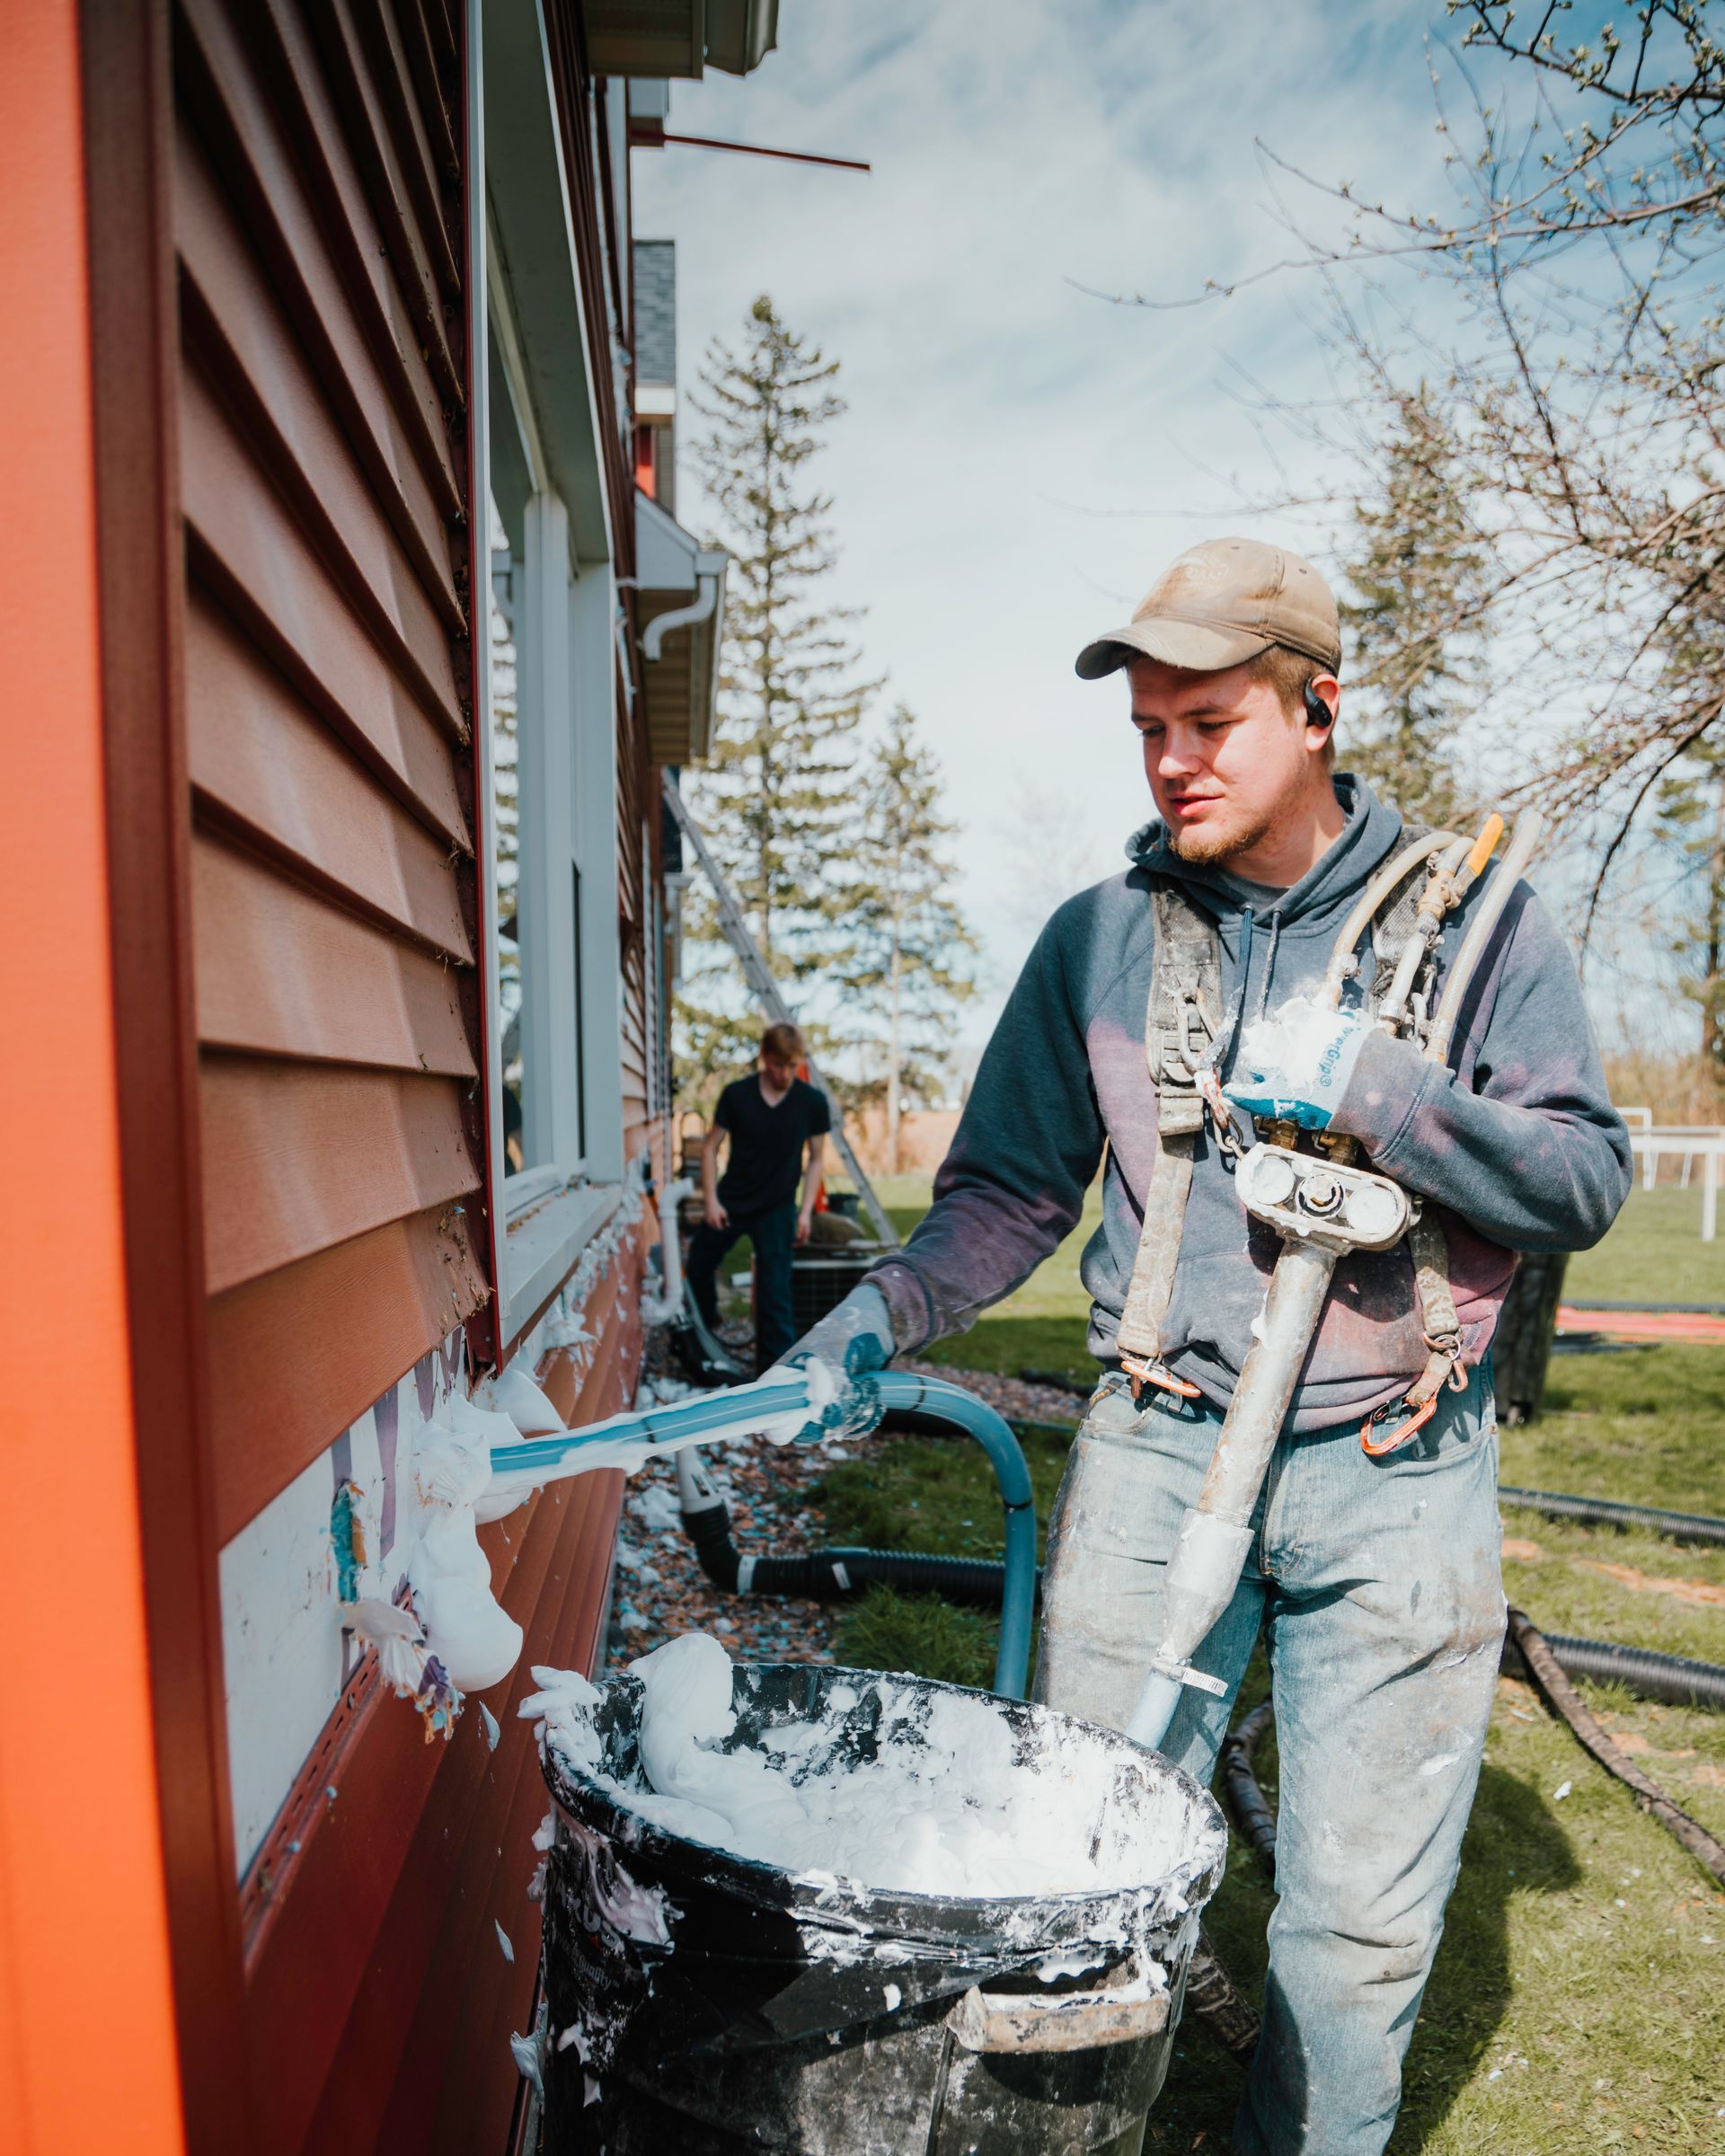
Injecting the RetroFoam
Once the access holes are ready, installers inject RetroFoam into the wall cavities. The foam expands to fill voids, contouring around pipes, wires, and other obstacles. This precise process ensures even insulation, sealing the home against drafts and enhancing energy savings. RetroFoam’s ability to fill gaps around various materials ensures thorough coverage and efficiency.
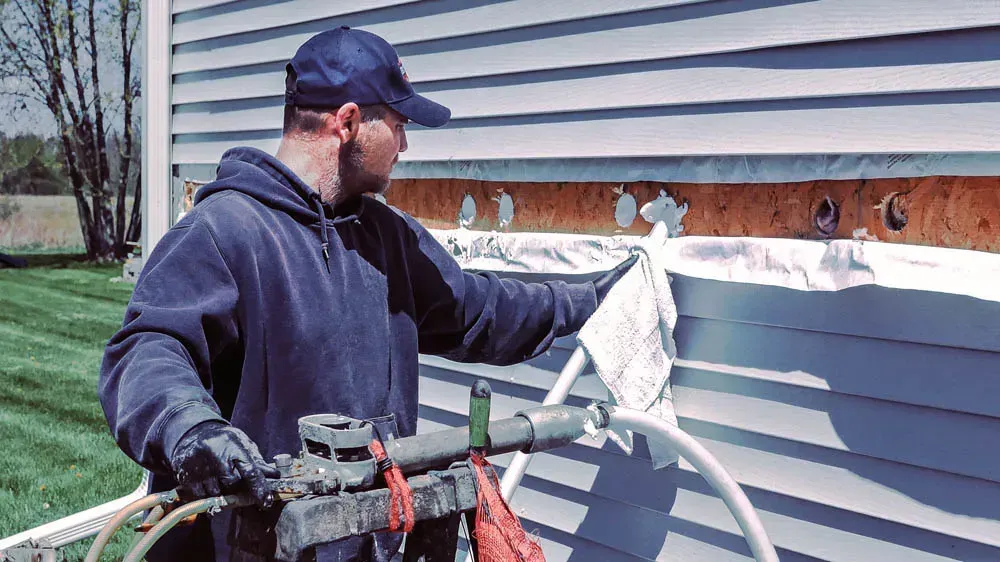
Sealing the Access Holes
Sealing the access holes is essential after the RetroFoam has expanded and filled the wall cavities. Technicians cover each opening with a durable patch that blends with the external wall surface, ensuring the home’s aesthetic integrity. This careful restoration step maintains the seamless look of the home’s exterior after the energy-saving RetroFoam insulation installation is complete. The process works effectively on various materials, including vinyl siding, brick, and wood, preserving both function and appearance.
Final Inspection and Cleanup
After installing RetroFoam insulation, technicians conduct a final inspection to ensure even distribution and proper sealing of access holes. They meticulously clean the area, leaving the home as neat as they found it. The inspection confirms that RetroFoam is evenly spread within the wall cavities and that all access holes in various materials, including wood, vinyl siding, and brick, are sealed precisely. A thorough cleaning ensures the work site is pristine, preserving the home’s exterior appearance and benefiting from the energy-saving insulation.
Why Choose RetroFoam Insulation for Your Home
Choosing RetroFoam insulation is a smart move for homeowners seeking to enhance their living environment. RetroFoam’s innovative formula provides an advanced solution for sealing homes against the elements, significantly improving energy efficiency and reducing utility bills. This insulation ensures consistent and comfortable temperatures throughout the home, regardless of the season, elevating overall comfort.
Additionally, RetroFoam’s commitment to customers is evident in its lifetime warranty and unparalleled product support. With RetroFoam insulation, homeowners can enjoy peace of mind knowing their homes are more energy-efficient and comfortable. It is suitable for walls and other spaces.
Benefits of RetroFoam’s Unique Formula
The standout feature of RetroFoam insulation is its innovative formula, designed to create an airtight seal. This results in optimal thermal insulation and sound dampening, greatly enhancing a home’s comfort and energy efficiency. Its unique properties also inhibit mold growth and allergens, improving indoor air quality for a healthier living environment. Suitable for walls and other spaces, RetroFoam offers advanced protection against environmental elements.
Enhancing Home Comfort Year-Round
RetroFoam insulation provides year-round comfort, maintaining a uniform temperature regardless of the weather. It ensures a cozy interior from January to December. Preparation is key: choosing the right product, getting a professional evaluation from Mammoth Home Renovations, and preparing the area for installation. The structured timeline sets clear expectations. Final inspection and cleanup restore your home, revealing enhanced comfort and efficiency. RetroFoam adapts to various materials like wood, vinyl siding, and brick, ensuring effective insulation.
Lifetime Warranty and Product Support
Embracing RetroFoam insulation comes with the assurance of steadfast support and a robust lifetime warranty. Homeowners can rest easy knowing that the insulation’s durability and performance are guaranteed. Backed by a dedicated team, RetroFoam provides exceptional after-sales service and support, addressing any concerns post-installation. This includes assistance with wall insulation and injection foam insulation, ensuring a comprehensive and worry-free experience.
How RetroFoam Insulation Complements Existing Insulation
Integrating RetroFoam insulation into your home enhances existing materials, boosting your home’s thermal defenses. This compatibility allows homeowners to improve energy efficiency without removing current insulation. RetroFoam adds benefits like improved sound dampening and air sealing, complementing the thermal resistance of traditional insulation. Homeowners considering a hybrid approach will find that combining RetroFoam with other insulation methods maximizes energy savings and creates a more comfortable living environment. This solution works well with materials like wood, vinyl siding, and brick.
Compatibility With Existing Insulation Types
When RetroFoam installation is planned, homeowners are relieved to learn it can be used alongside existing fiberglass insulation. RetroFoam fills gaps that traditional insulation misses, creating a comprehensive barrier against energy loss without requiring a costly and disruptive removal. This integration enhances energy efficiency and comfort, making it an ideal solution for improving wall insulation and other areas while maintaining the benefits of existing materials.
Benefits of Supplemental RetroFoam Insulation
Adding RetroFoam insulation to existing fiberglass insulation works wonders for energy conservation and comfort. It seamlessly fills gaps that previous insulation may miss, enhancing overall thermal performance and reducing noise penetration. The result is an impressive upgrade in both energy efficiency and living quality. This combination ensures a comprehensive barrier against energy loss, making it a smart choice for homeowners looking to improve their wall insulation and overall home environment.
Recommendations for Combined Insulation Solutions
Homeowners seeking a comprehensive upgrade can combine RetroFoam with existing fiberglass insulation for maximum energy efficiency; by pairing RetroFoam with these materials, the home benefits from a dual-action approach. RetroFoam fills gaps that other materials can’t reach, while the existing insulation provides a solid base of thermal resistance. This combination ensures optimal thermal performance, reducing energy loss and enhancing comfort throughout the home.
Ensuring a Smooth RetroFoam Installation Experience
As RetroFoam insulation installation day nears, clear communication with the installation team is crucial. Understanding the schedule, addressing the installer’s needs, and voicing concerns ensures a smooth process. Proper planning leads to a successful upgrade, enhancing energy efficiency and comfort. This preparation makes the day efficient and satisfying for both parties, ensuring your home benefits from RetroFoam’s superior insulation.
What to Expect on Installation Day
On installation day, homeowners can expect the RetroFoam installers to arrive with the equipment and materials ready to start the day’s work. After a brief overview with the homeowner, they’ll begin the process by setting up their work area and taking great care to minimize the disruption to the household. The atmosphere is professional and efficient, with the team working diligently to ensure the project stays on track and is completed within the outlined timeframe.
How to Communicate Effectively With Your Installer
Clear communication is essential for a successful RetroFoam insulation installation. Homeowners should discuss expectations and any concerns before the installation begins. Keeping lines of communication open during the installation allows for prompt addressing of questions or issues. A final walkthrough with the installer ensures the work meets your standards. This proactive dialogue ensures the project progresses smoothly, enhancing the home’s energy efficiency and comfort.
How to Maintain Your RetroFoam Insulation for Maximum Efficiency
Routine monitoring and maintenance are crucial to keep RetroFoam insulation performing at its best. Identifying and addressing issues early extends insulation life and ensures optimal energy savings. This section offers practical tips for routine checks and advises when to call a professional for a comprehensive inspection. Staying proactive with maintenance helps homeowners preserve the effectiveness of RetroFoam insulation for years, enhancing energy efficiency and comfort.
Routine Checks and Maintenance Tips
For homeowners who have invested in RetroFoam insulation, it’s important to occasionally inspect the exterior where injection points were sealed to ensure they remain intact and weatherproof. If you notice any issues, give us a call at Mammoth Home Renovations, and we can address any concerns and refill any missed spots, ensuring the continued effectiveness of RetroFoam insulation.
When to Consult a Professional for Inspections
Even with diligent upkeep, circumstances may arise when a professional’s expertise is essential for assessing your RetroFoam insulation’s condition. Homeowners should seek a professional evaluation if they encounter unexplained spikes in energy bills or feel drafts that suggest a breach in the insulation barrier, as these could indicate areas where the foam has settled or did not adhere correctly during installation.
Conclusion
RetroFoam insulation offers a transformative upgrade for homes, enhancing comfort and driving down energy costs with its unique formula. The installation process is streamlined and efficient, ensuring minimal disruption while maximizing energy efficiency. Homeowners can enjoy long-term benefits, including improved thermal regulation and significant savings on utility bills, with reliable support and a lifetime warranty. By choosing RetroFoam, individuals invest in a sustainable, high-performance insulation solution that meets the varied needs of their homes and lifestyles.
Recent Posts

Learn More About
Mammoth Home Renovations
Serving the Fox Cities area of Wisconsin, Mammoth Home Renovations specializes in insulation services and exterior and interior remodeling. One-stop-shop for home renovations. Quick-to-act discount. Financing available. Call or text for a free estimate.

Share On: